For bare-rooted plants
Unpack and soak roots in water for 1–2 hours or hose them to keep them damp. Store trees upright in a shallow hole with loose soil or in a container filled with fine pine bark or similar, in a cool, shaded area with good drainage. Keep roots moist. Trees can stay like this until they start budding in late winter or early spring.

Planting
Prepare planting sites at least a few weeks in advance (or longer if possible).
1. Site Selection: Choose a sunny spot with good drainage and no competition from large tree roots. Water should soak into the ground within an hour of rain or watering, leaving the soil around the roots moist, but not saturated.
2. Trellis Erection: If possible install trellis before preparing the soil.
3. Soil Preparation: Remove weeds and loosen compacted soil without mixing layers. Lightly mix compost or aged manure into the topsoil. Avoid fertiliser until planting to prevent nutrient loss.
Important: Do not fill planting holes with compost or soil additives. Treat the whole planting area the same to encourage root spread and avoid water-logging or pot-like conditions.
4. Dig the Hole: Dig holes before removing trees from storage, ideally before delivery. Check that each hole drains well.
Size should be wide enough for roots to be spread-out e.g. about 20 cm deep and 40+ cm wide. Avoid digging too deep to prevent water pooling under roots. Loosen hard soil at the bottom. In dry conditions, pour in water and let it fully drain before planting.
5. Plant the Tree: Plant with the graft or bud union above the soil and the trunk upright. Refill hole using the original soil only. Don’t fill the hole with compost etc. Add slow-release fertiliser at recommended rate. Tie to a stake or trellis and firm soil gently before watering-in.
6. Staking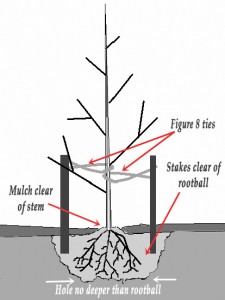 : Staking may not be needed unless it's a windy site. Tie trees to a trellis frame if being used or use two stakes. Use soft, elastic ties in a figure-eight shape.
Apple M9 rootstock: Needs support for life.
Apple M26: May be free-standing if sheltered.
Apple MM102, MM106, MM111: Generally self-supporting once established.
7. Mulch and Watering: Create a 40 cm-wide watering basin around the tree to catch water. Water thoroughly after planting. Adding seaweed solution at planting is helpful but optional.
Important: Avoid over-watering bare-rooted trees. They don’t need much water until they start growing actively. In mild, rainy conditions, they may not need extra water for weeks. Overwatering can harm or kill the tree.
Mulch helps retain moisture, suppress weeds and prevent runoff. Suitable mulches include bark, straw, or compost. Keep mulch away from the trunk.